In the fast-paced world of software development, making sure those new features and bug fixes reach their destination is key.
Traditional deployment methods, with all their manual fuss and time-chewing antics, can really put a damper on your innovation parade. But hang tight! Enter Continuous Delivery Pipelines (CD Pipelines) to save the day.
CD Pipelines automate the entire software delivery process, streamlining the journey from code commit to running application. Say goodbye to update delays and hello to software that’s as dependable as your morning coffee routine. Get ready to unleash top-notch software like it’s going out of style!
Learn to Deploy with Every Code Change!
This hands-on guide will show you how to set up a pipeline that automatically updates your web application whenever you make a code change. I’ll use popular tools like GitHub and AWS to achieve this continuous delivery magic.
By the end, you’ll be able to:
- Store your code in a version control system (AWS CodeCommit)
- Create an environment on AWS Elastic Beanstalk to host your application
- Automate building your code from CodeCommit
- Set up a pipeline that triggers deployments on code updates
Before we dive in, make sure you have:
- An AWS account
- Git installed on your computer
Ready to streamline your deployments? Let’s get started!
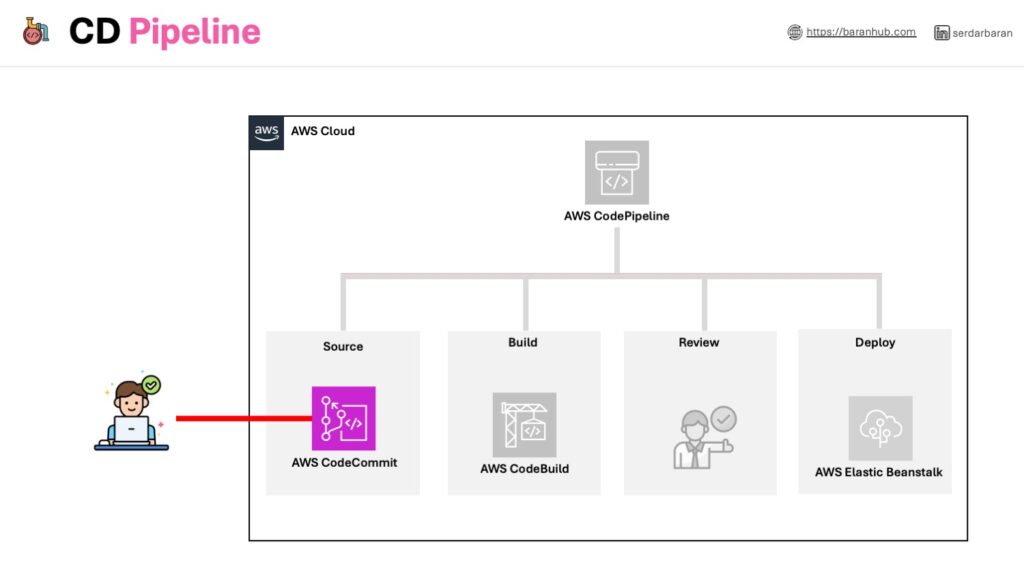
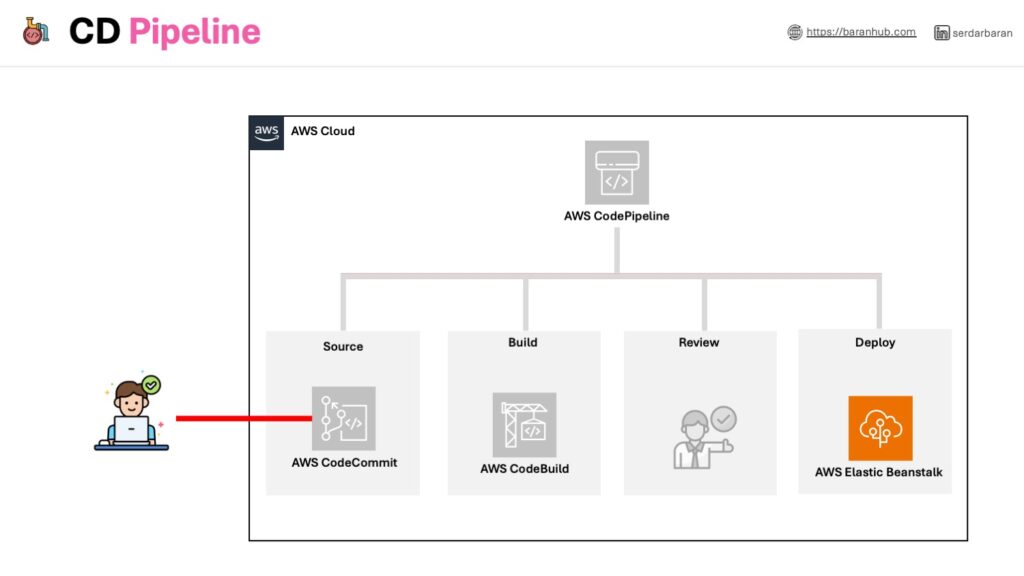
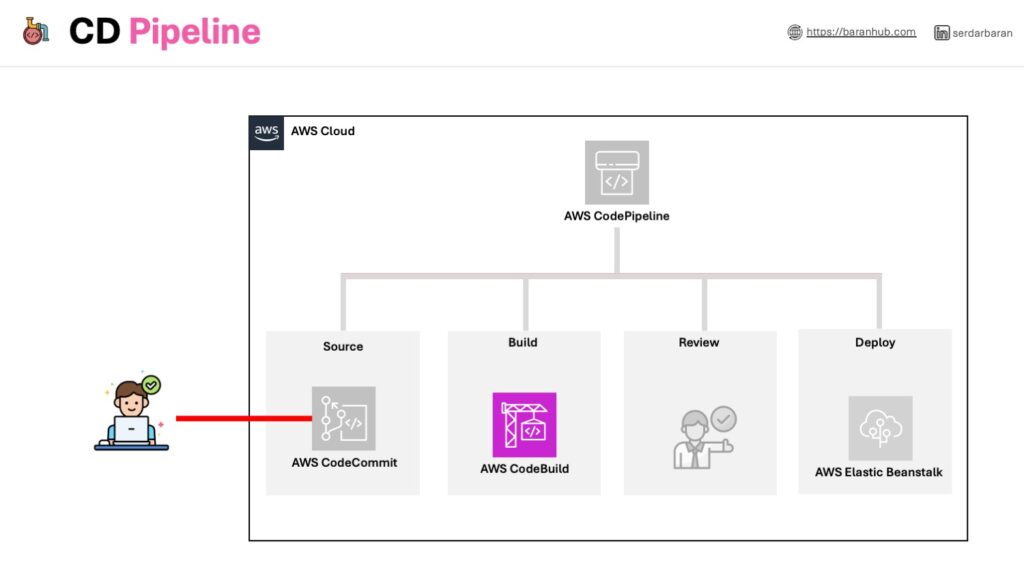
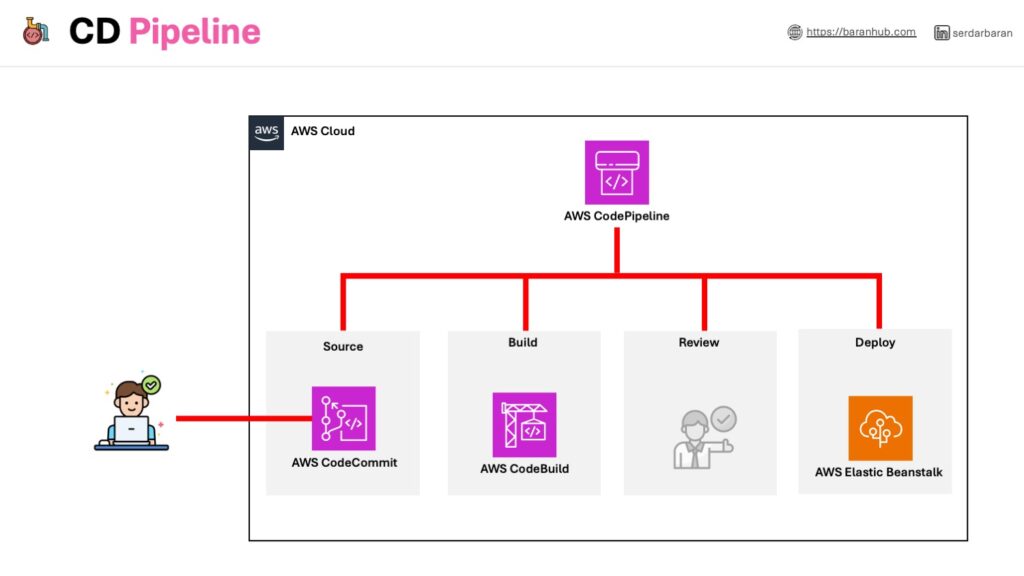
Behind the Scenes: The Services Working Together
This diagram offers a roadmap of the tools we’ll be using throughout this tutorial. Let’s break down how these services work together to automate your deployments:
- AWS CodeCommit: Acts as the central hub for storing your code and tracking changes.
- AWS Elastic Beanstalk: Provides a platform to easily deploy and manage your web application in the cloud.
- AWS CodeBuild: Automates the process of building your application from the code stored in GitHub.
- AWS CodePipeline: Ties everything together, creating a pipeline that triggers deployments whenever you update your code in CodeCommit.
We’ll delve deeper into each service as we progress through the tutorial, and provide resources to help you learn more about them.

Step 1 – Set Up AWS CodeCommit Repo
What is Git repository(repo) and How does AWS CodeCommit helps?
All the files and directories that will be tracked by the version control system, including metadata. Each user will interact with a complete copy locally and push files to the hosted version to share changes.AWS CodeCommit is a secure, highly scalable, fully managed source control service that hosts private Git repositories. Alternative popular solutions are Github, GitLab, Bitbucket, etc.
- In the browser, navigate to the CodeCommit panel.
- Choose “Create repository”.
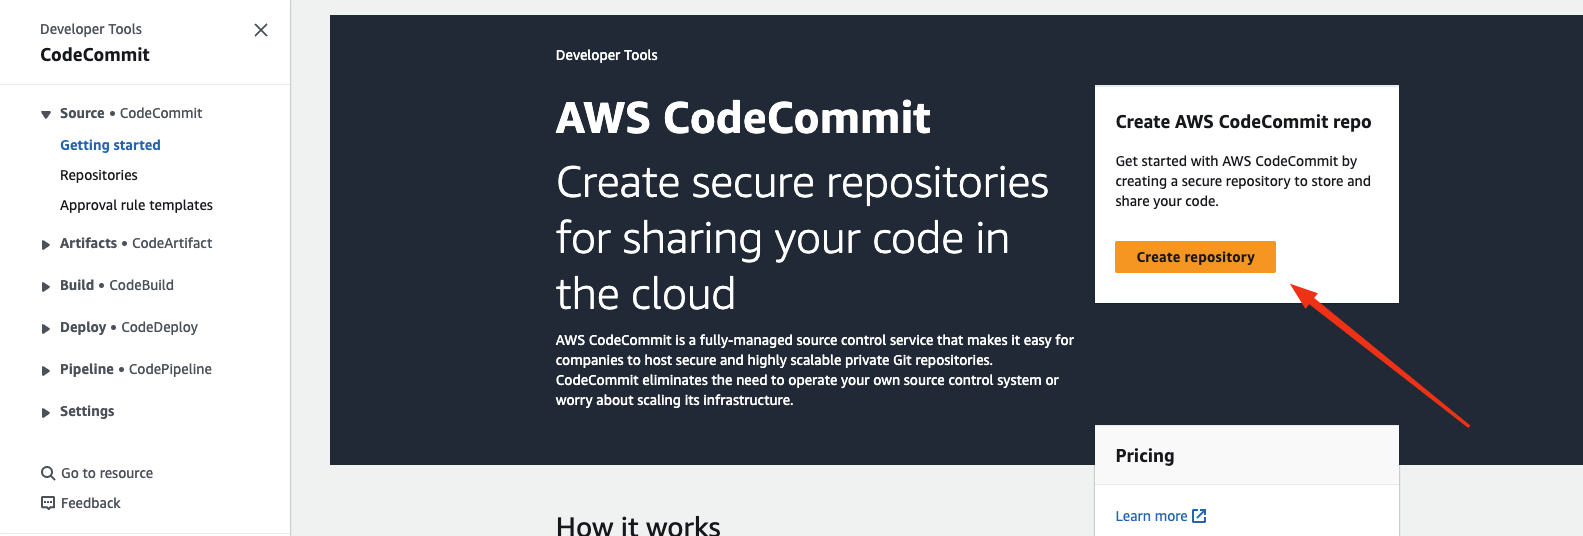
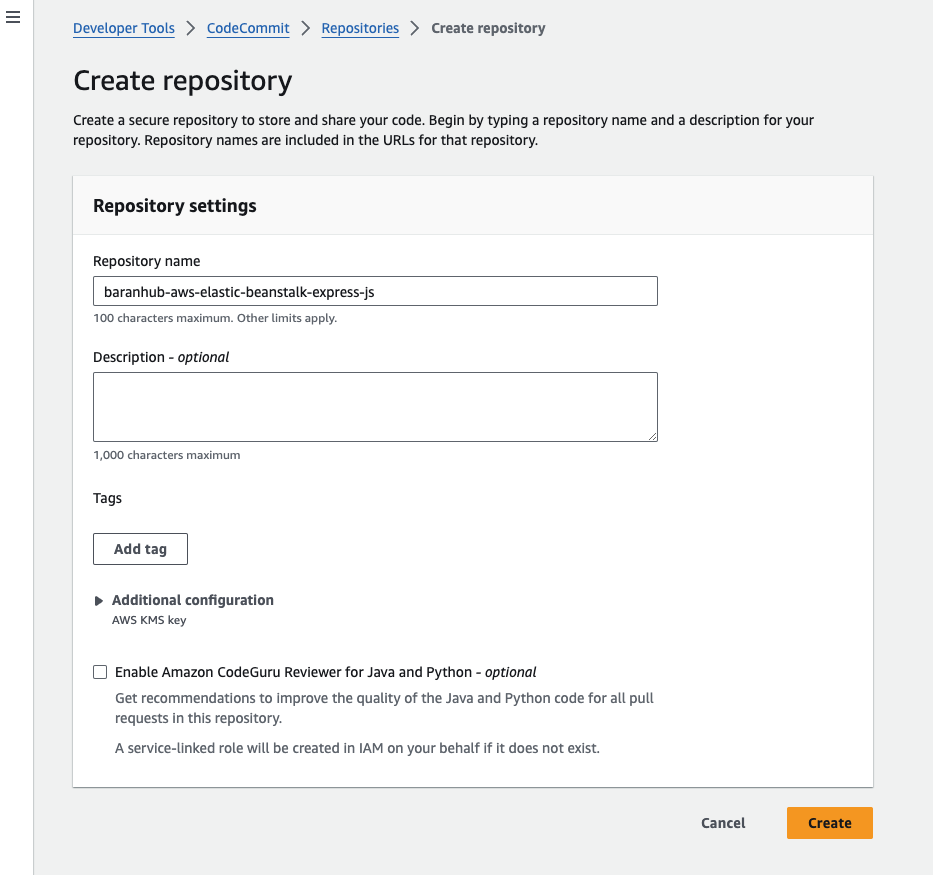
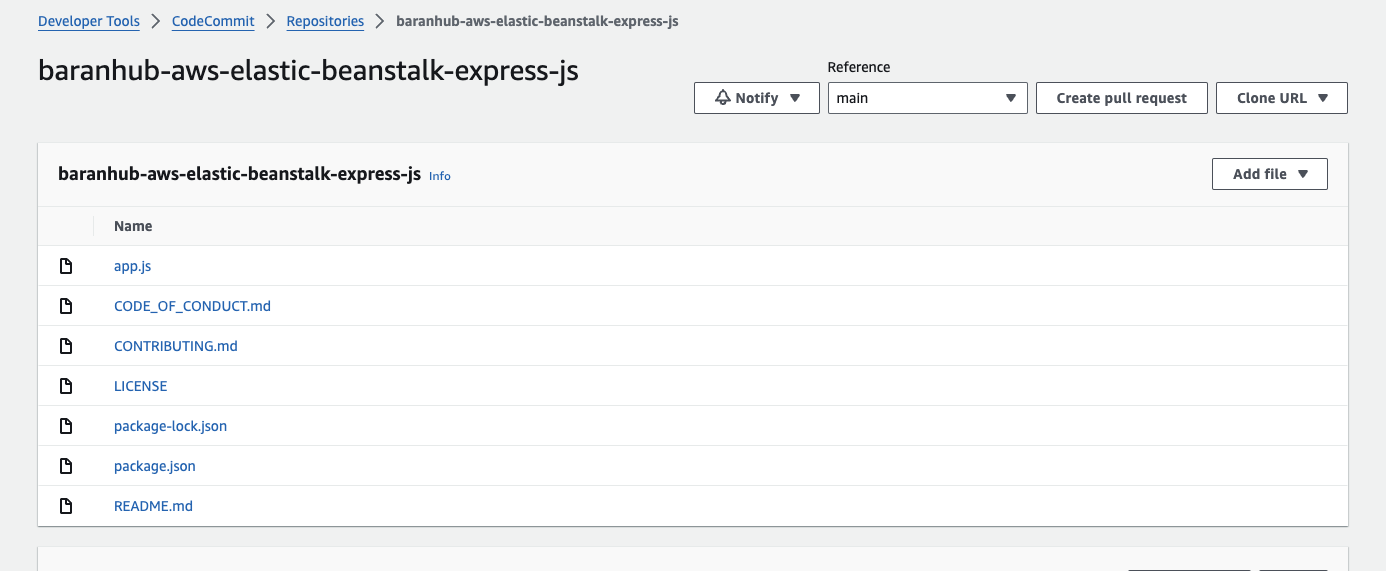
- In the repository name, give name of “baranhub-aws-elastic-beanstalk-express-js”
- Choose “Create”
- Upon successful repo creation, copy the command including the url for the newly created repository.
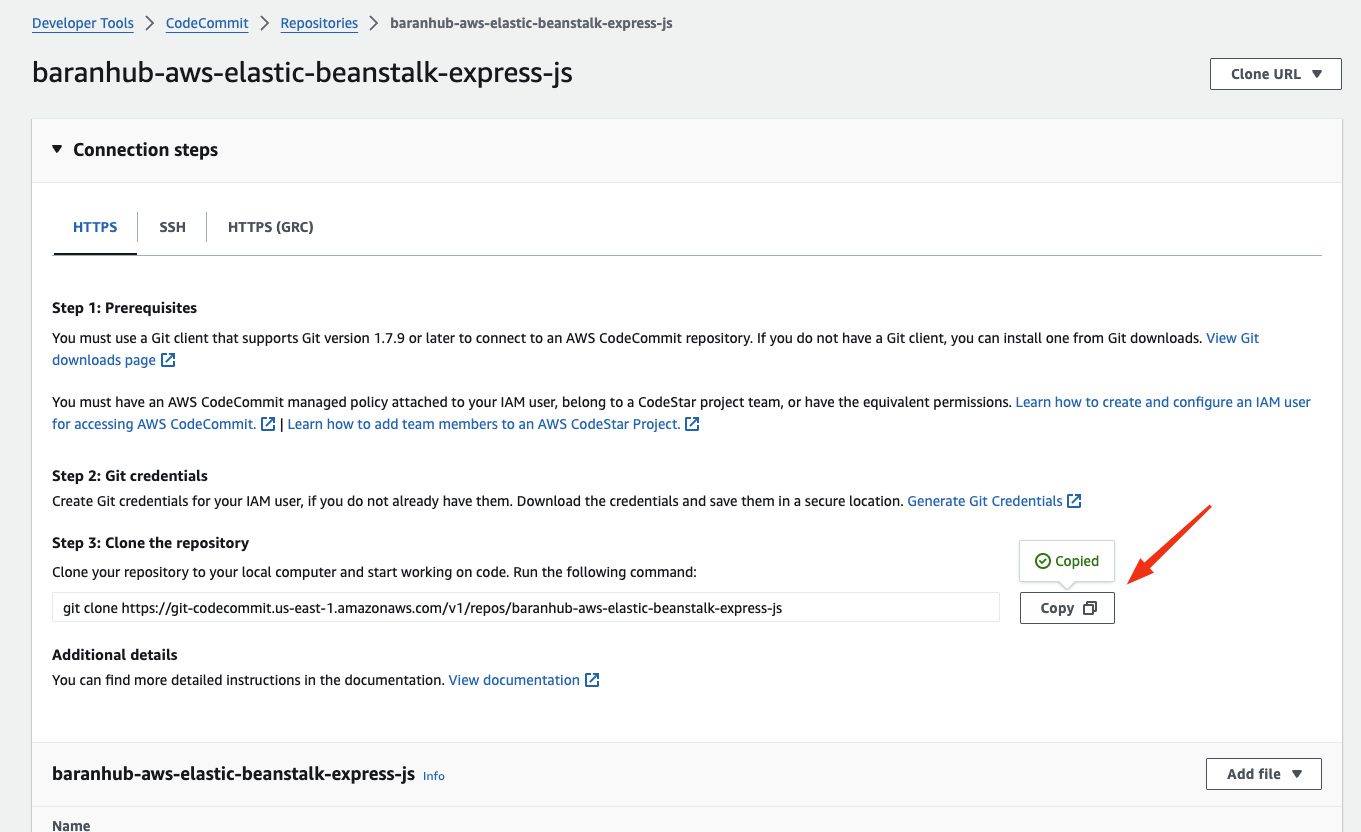
- Move to your local terminal and run the following command and don’t forget to replace the url with your one.
It will clone the repo from CodeCommit to your local directory.
git clone https://git-codecommit.us-east-1.amazonaws.com/v1/repos/baranhub-aws-elastic-beanstalk-express-js- The next thing is we will copy the content to from the following Github repository and move it the CodeCommit local repository.
# Clone the Github repo and move the files to the CodeCommit directory
git clone https://github.com/aws-samples/aws-elastic-beanstalk-express-js-sample.git && mv aws-elastic-beanstalk-express-js-sample/* baranhub-aws-elastic-beanstalk-express-js/ - Run the commands below in your local terminal to commit & push all the files to remote main branch in CodeCommit repo.
# Move into the codecommit repo
cd baranhub-aws-elastic-beanstalk-express-js

# commit the files
git add .

# Commit the files
git commit -m "initial files are added to repo"

# Push the files to remove repo
git push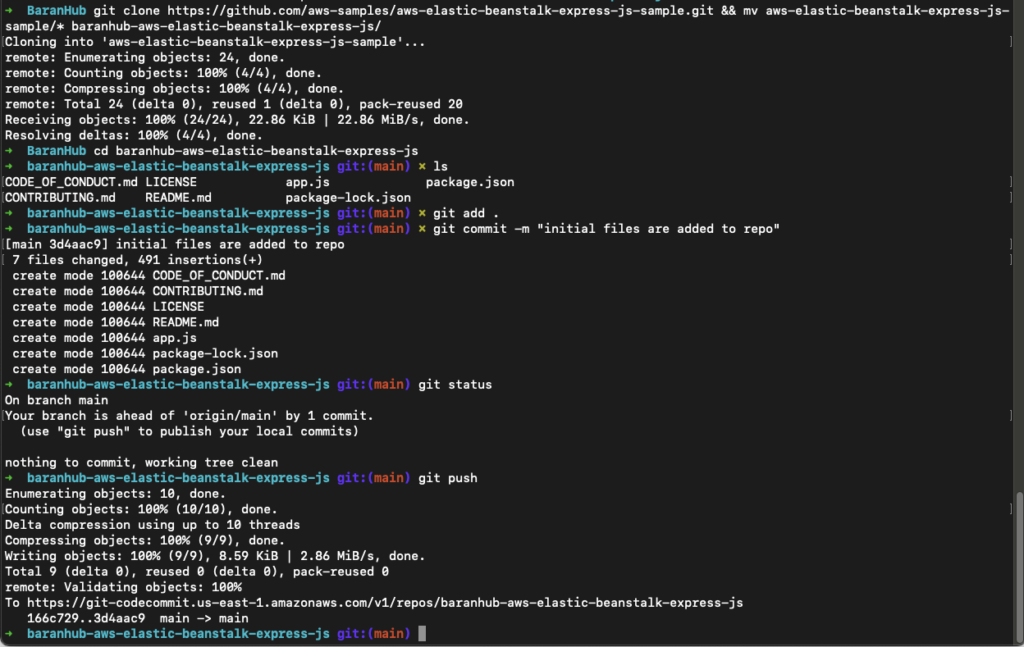
- Confirm if the files are pushed to the remote repo from the CodeCommit console.
Application architecture
Here is what our architecture looks like right now:
We’ve built a code repository – a central storage for our simple web app. Now, let’s configure it for seamless code updates. This prepped repository will be the starting point for our continuous delivery pipeline.
Step 2 – Deploy Web App Effortlessly with AWS Elastic Beanstalk
This module dives into AWS Elastic Beanstalk, a service that streamlines deploying and managing your web applications on the cloud.
With Elastic Beanstalk, you can ditch the complexities of managing underlying infrastructure and focus on what matters – your code.
By the end of this module, you’ll be equipped to leverage AWS Elastic Beanstalk for effortless deployments, allowing you to focus on building amazing applications.
Key Concepts Explained:
- AWS Elastic Beanstalk: The hero of this module, making application deployment on AWS a breeze. Simply upload your code, and Elastic Beanstalk takes care of the rest, from deployment to management and scaling.
- Environment: Imagine a designated space for your application to reside. This environment, provisioned by Elastic Beanstalk, encompasses all the necessary AWS resources to keep your app running.
- EC2 Instance: Think of this as your virtual server in the cloud. When creating an environment, Elastic Beanstalk will set up one or more EC2 instances to power your application.
- Web Server: The unseen conductor of your web application. It utilizes the HTTP protocol to deliver web pages to users by processing and storing content.
- Platform: A perfect combination of operating system, web server, application server, programming language runtime, and Elastic Beanstalk components. This platform acts as the foundation upon which your application runs.
Setup an AWS Elastic Beanstalk app
- Open the AWS Elastic Beanstalk Console: In a separate browser tab, navigate to the AWS Elastic Beanstalk console. You can find it within the AWS Management Console.
- Create a New Application: Click the prominent orange button labeled “Create Application” to get started.
- Choose the option labeled “Web server environment”. This signifies the type of environment you’re creating, optimised for running web applications.
- Application Name: Enter a name for your application in the text box provided under the heading “Application name”. For this tutorial, let’s use “BaranHubDevOps”.
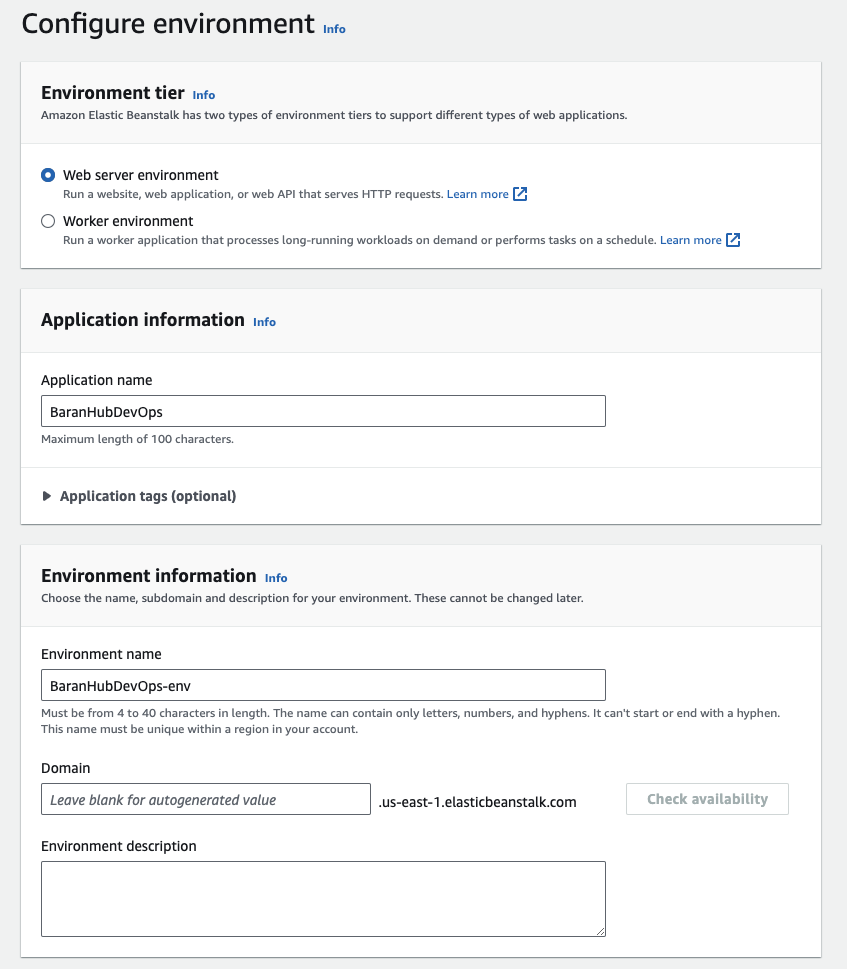
- Platform Selection: Navigate to the “Platform” dropdown menu under the “Platform” heading. From the list, select “Node.js”. The platform branch and version will automatically populate with default selections based on your chosen Node.js version.
- Sample Application Code: Ensure the radio button next to “Sample application” under the “Application code” heading is selected. This will use the built-in sample application provided by Elastic Beanstalk for demonstration purposes.
- Single Instance Preset: Under the “Presets” heading, verify that the radio button next to “Single instance (free tier eligible)” is selected. This creates a basic environment with a single instance, suitable for this tutorial and potentially eligible for the AWS Free Tier.
- Move Forward: Once you’ve confirmed all the selections, click the “Next” button to proceed to the next step of the configuration process.

- On the “Configure service access” screen, choose the option “Use an existing service role” for Service Role.
- The “EC2 instance profile” dropdown list might display different options depending on your prior environment creations. Don’t worry, I’ll guide you through the selection process.
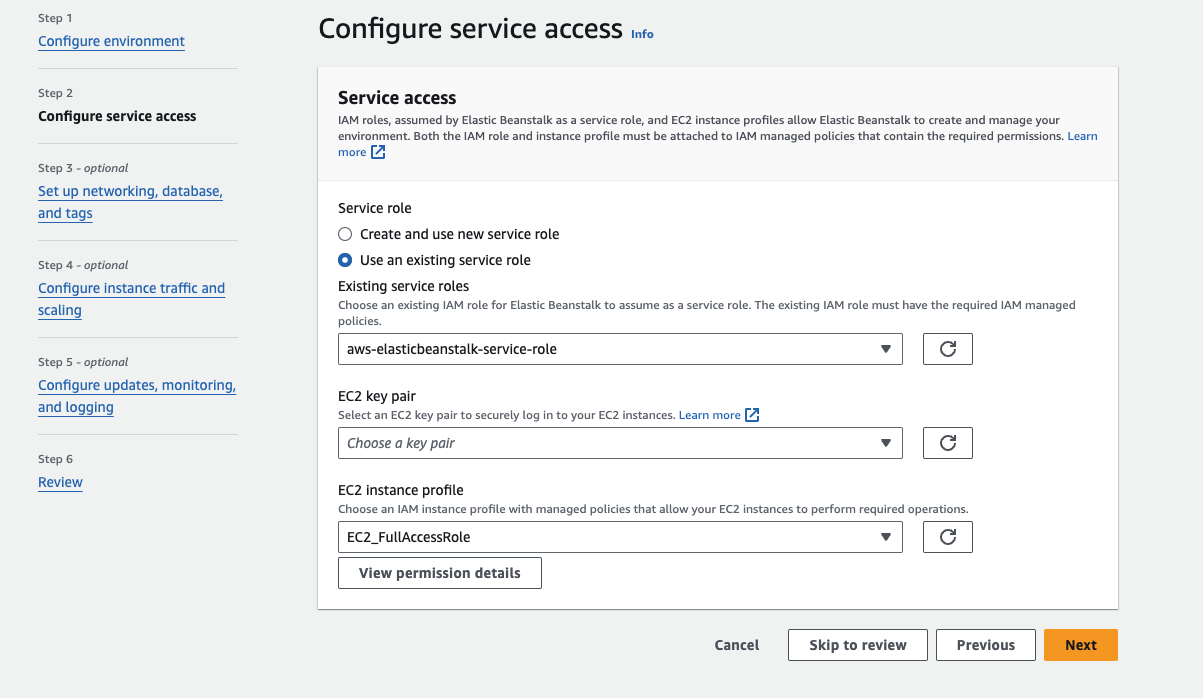
- Here’s how to choose the right option:
- If “aws-elasticbeanstalk-ec2-role” appears in the list, select it. This is the ideal choice for most users.
- If a different value is displayed and seems to be the default EC2 instance profile for your environments, select that one.
- If the list is empty, we’ll need to create a new IAM role. Follow the instructions for Create IAM Role for EC2 instance profile (not covered in this walkthrough). After creating the IAM role, refresh this page and select the newly created role from the dropdown list.
- Click “Skip to Review” on the “Configure service access” page. This simplifies the configuration by utilising existing resources or creating a new IAM role as needed, and then skipping the optional steps for this specific tutorial.
- The Review page displays a summary of all your choices.
- Choose Submit at the bottom of the page to initialise the creation of your new environment.
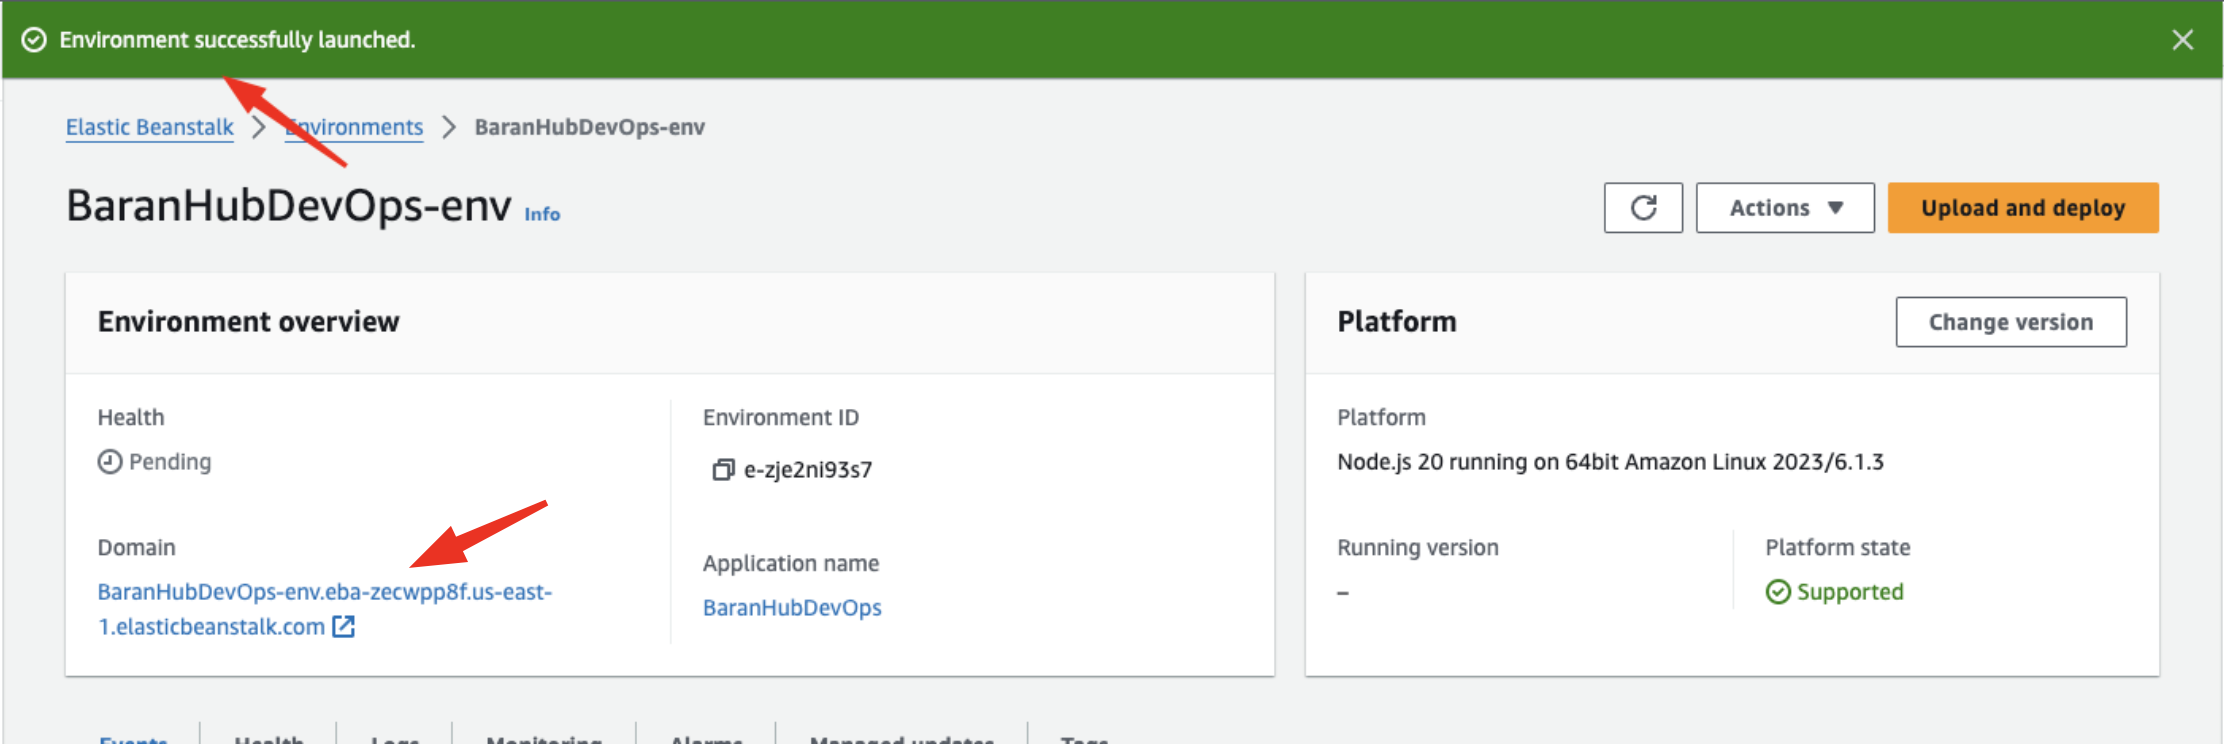
- Click on the domain url to verify whether the WebApp can be accessed successfully.

Application architecture
Now that we are done with this module, our architecture will look like this:
With an AWS Elastic Beanstalk environment and sample application in place, we’ll leverage our continuous delivery pipeline to deploy the “Hello World!” web app you created earlier.
Step 3 – Create Build Project
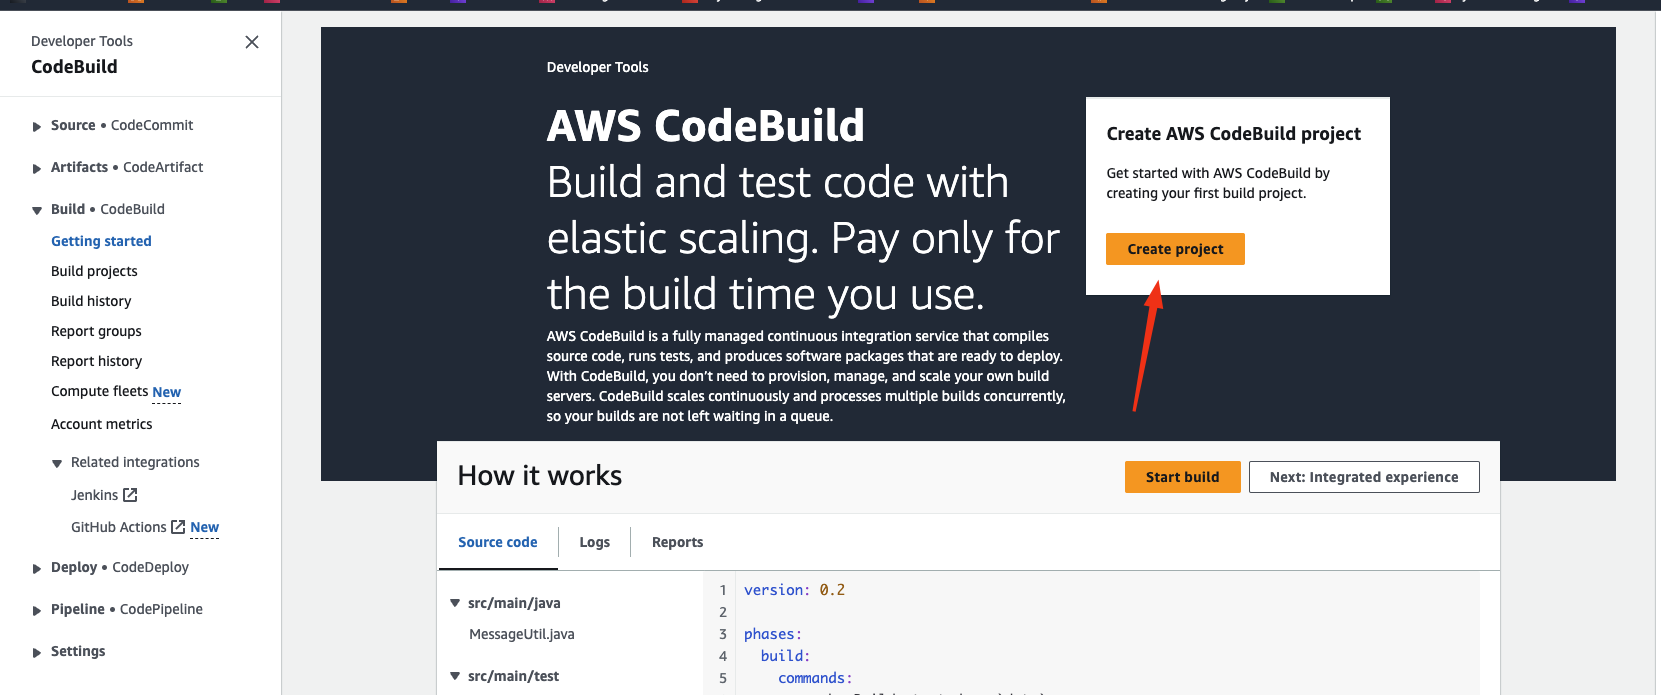
- In the browser, navigate to the AWS CodeBuild console.
- Choose the “Create project” button.
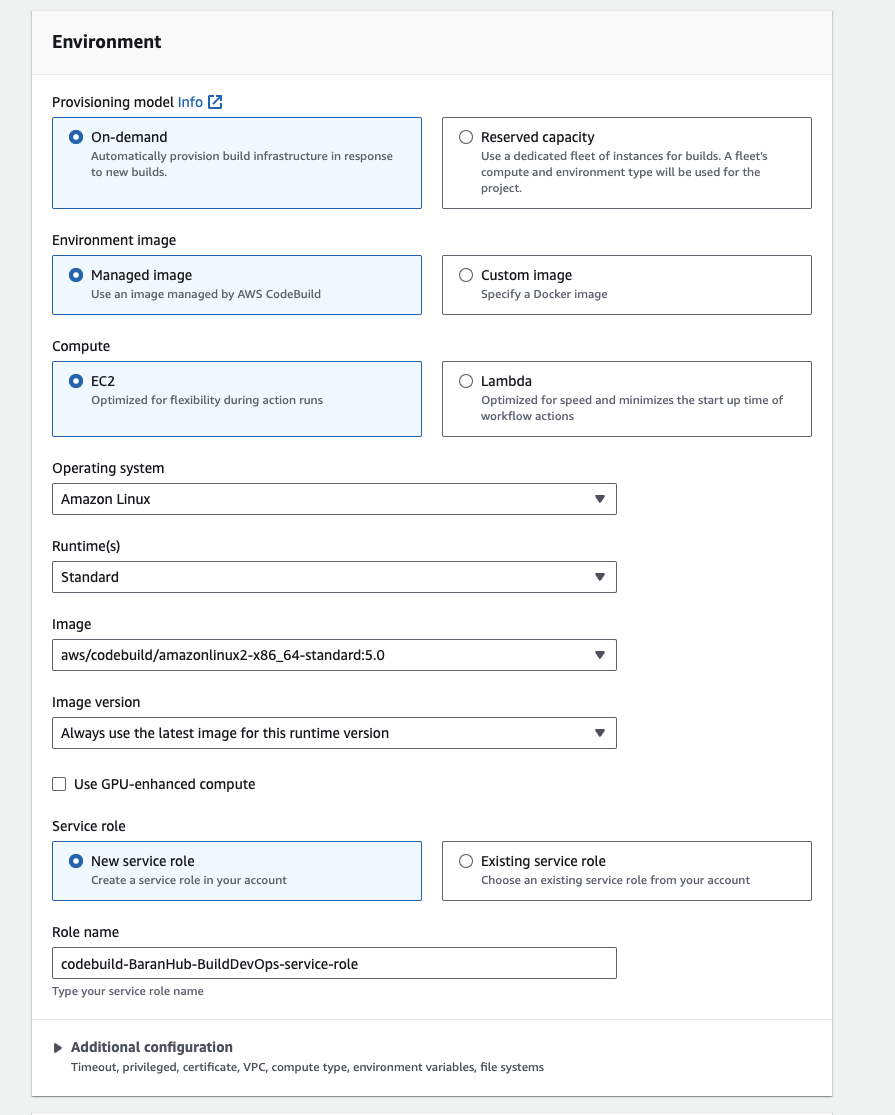
Configure the AWS CodeBuild project
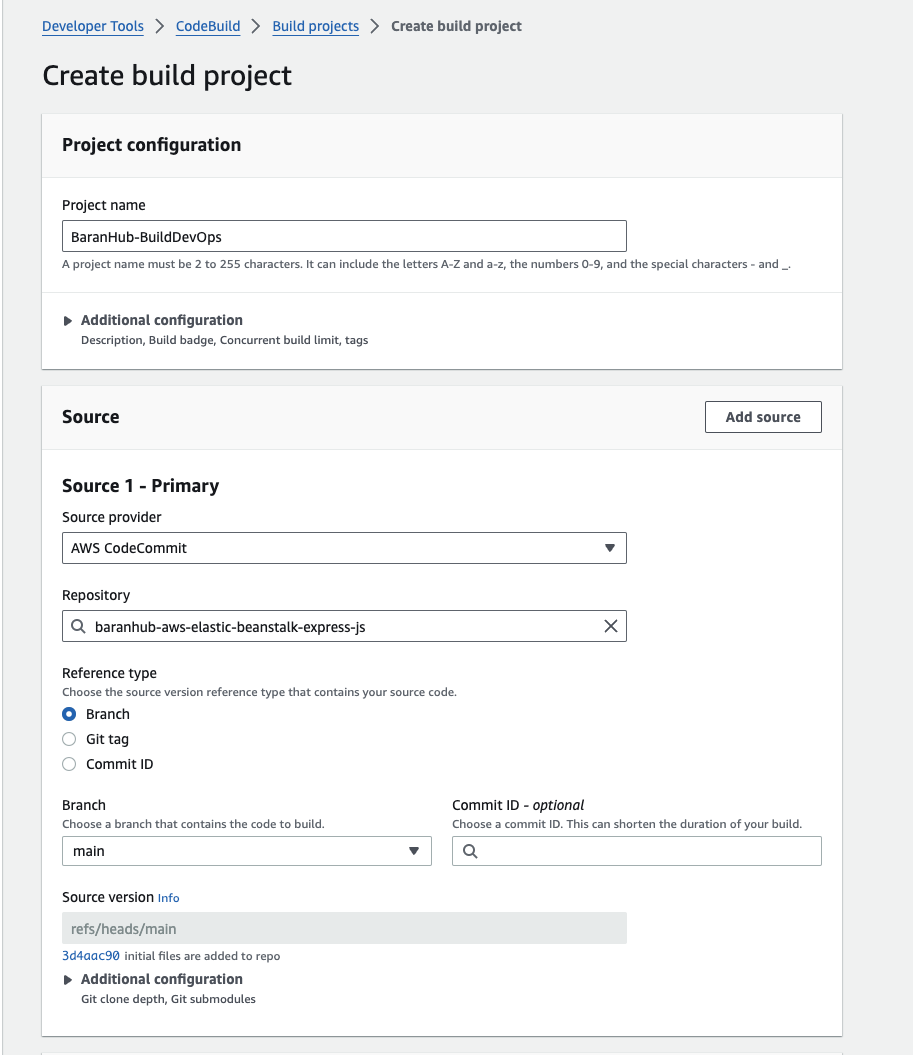
- In the Project name field, enter “BaranHub-BuildDevOps”.
- Select “AWS CodeCommit” as source provider
- Select “baranhub-aws-elastic-beanstalk-express-js” repository
- Select main branch
- Confirm that Managed Image is selected.
- Select Amazon Linux from the Operating system dropdown menu.
- Select Standard from the Runtime(s) dropdown menu.
- Select aws/codebuild/amazonlinux2-x86_64-standard:3.0 from the Image dropdown menu.
- Confirm that Always use the latest image for this runtime version is selected for Image version.
- Confirm that Linux is selected for Environment type.
- Confirm that New service role is selected.
Create a Buildspec file for the project
- Select “Insert build commands” and choose “Switch to editor”.
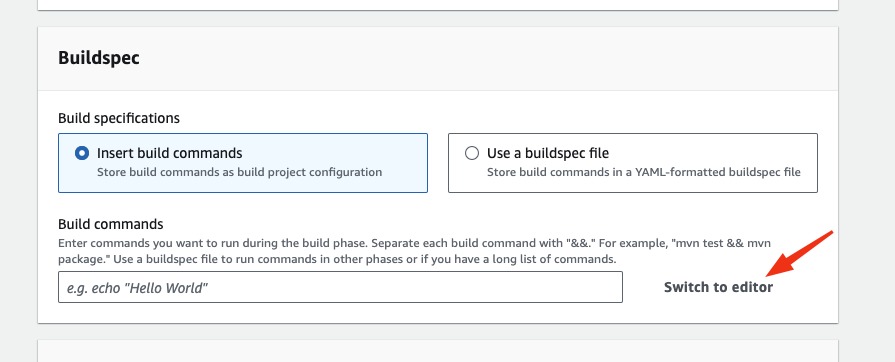
version: 0.2
phases:
    build:
        install:
            runtime-versions:
                nodejs: 20
        commands:
            - echo "Installing dependencies..."
            - npm i --save
    post_build:
        commands:
            - echo "Build completed successfully"
artifacts:
    files:
- '**/*'- Choose the Create build project button. You should now see a dashboard for your project.
- You should see the banner notification if the project is created successfully.

Test the CodeBuild project
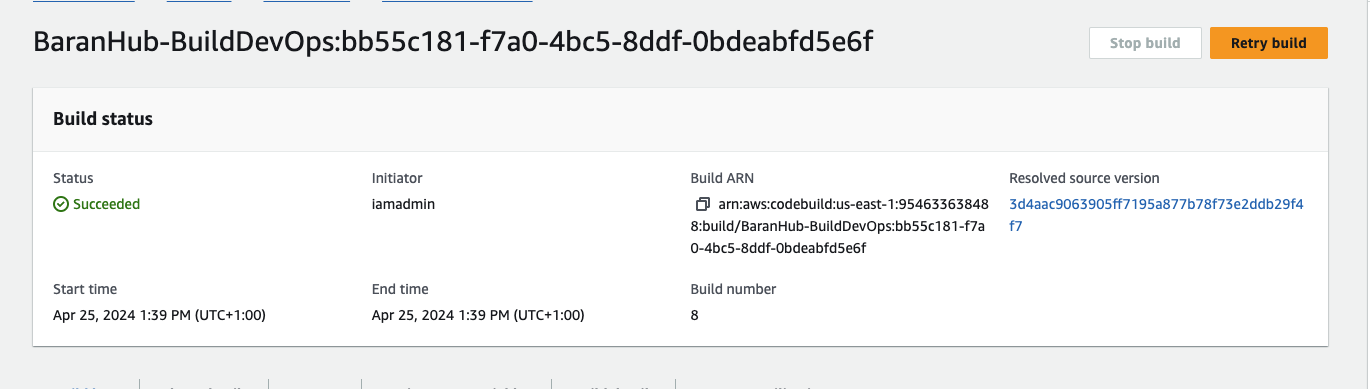
- Choose the Start build button. This will load a page to configure the build process.
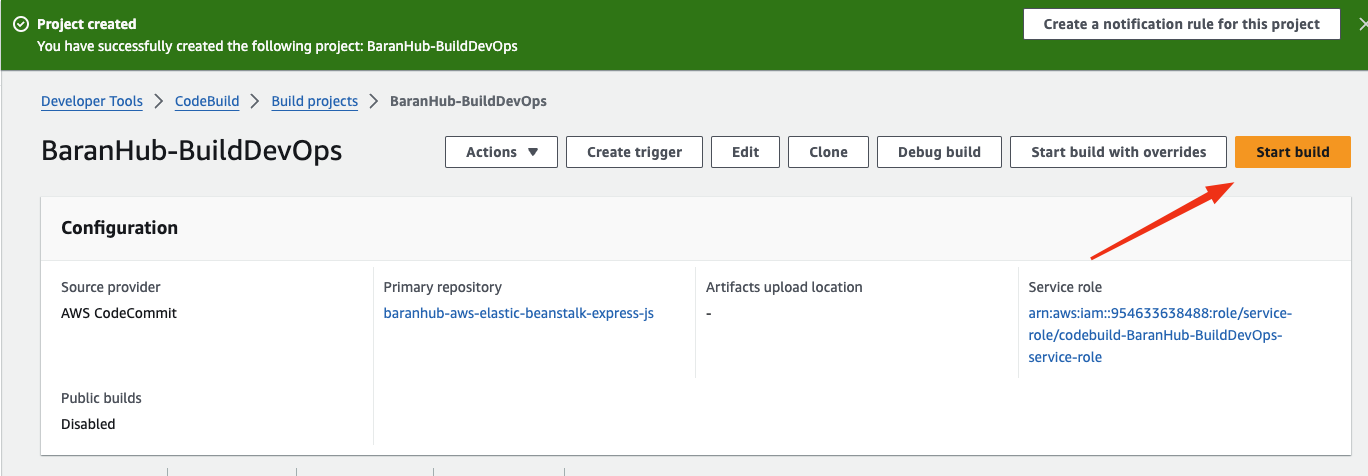
- Wait for the build to complete. As you are waiting you should see a green bar at the top of the page with the message Build started, the progress for your build under Build log, and, after a couple minutes, a green checkmark and a Succeeded message confirming the build worked.
Application architecture
Here’s what our architecture looks like now:
We’ve taken a big step towards automated deployments! This build project, created on AWS CodeBuild, streamlines the build process for your “Hello World!” web app stored in AWS CodeBuild. In the next module, we’ll integrate this project as the build step within our continuous delivery pipeline.
Step 4 – Create Delivery Pipeline
Launching Your Pipeline on AWS CodePipeline
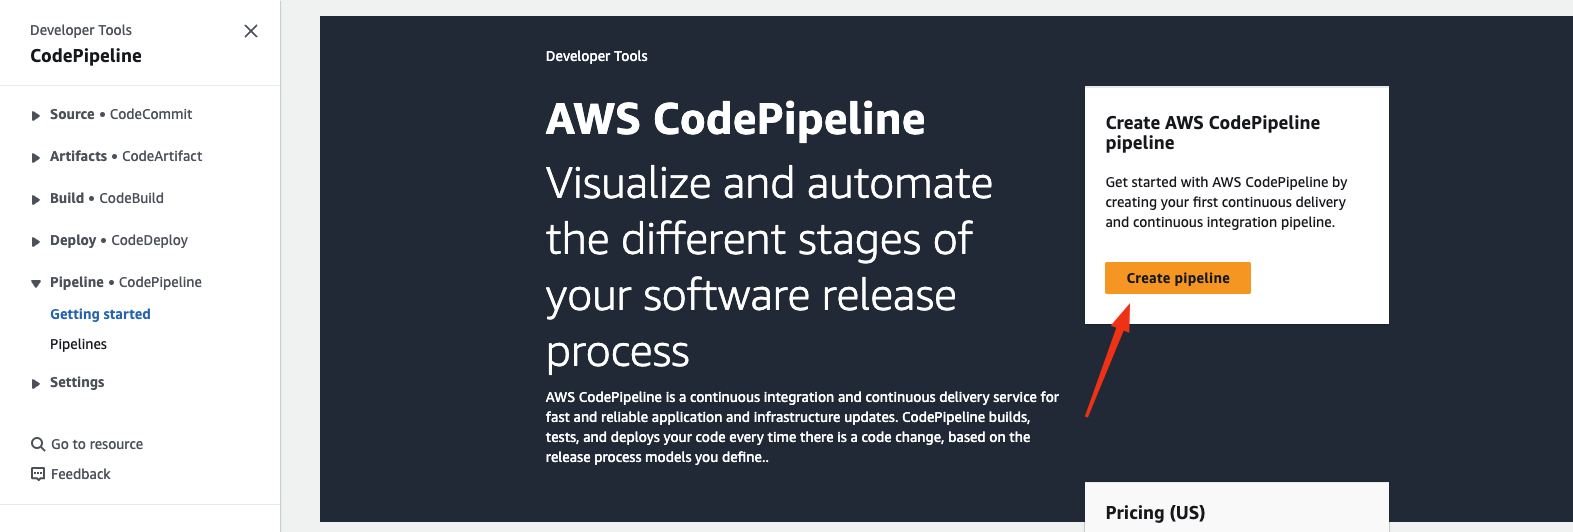
- Open a new browser window and head to the AWS CodePipeline console. You can find it within the AWS Management Console.
- Click the prominent orange button labeled “Create pipeline” to initiate the pipeline creation process.
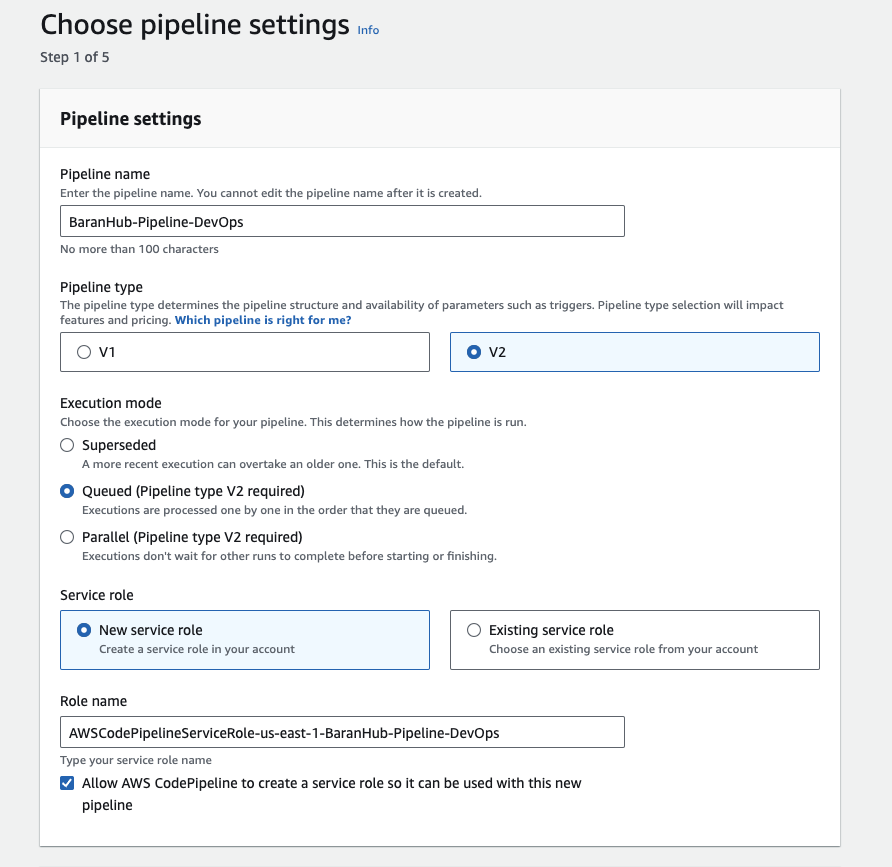
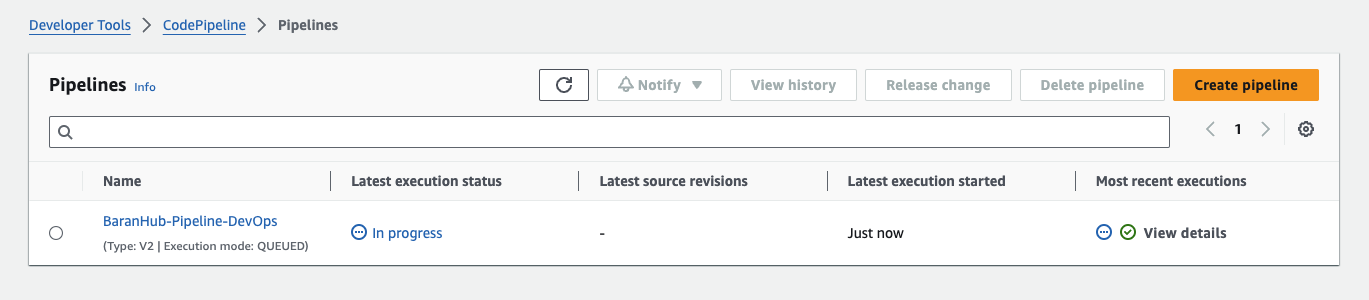
- In the designated field for “Pipeline name”, enter “BaranHub-Pipeline-DevOps”. This will give your pipeline a clear and recognisable name.
- Ensure that the option “New service role” is selected. AWS CodePipeline will create a new IAM role with the necessary permissions to manage your pipeline.
- Once you’ve entered the pipeline name and confirmed the service role selection, click the orange “Next” button to proceed to the next step of the configuration process.
Configure the build stage
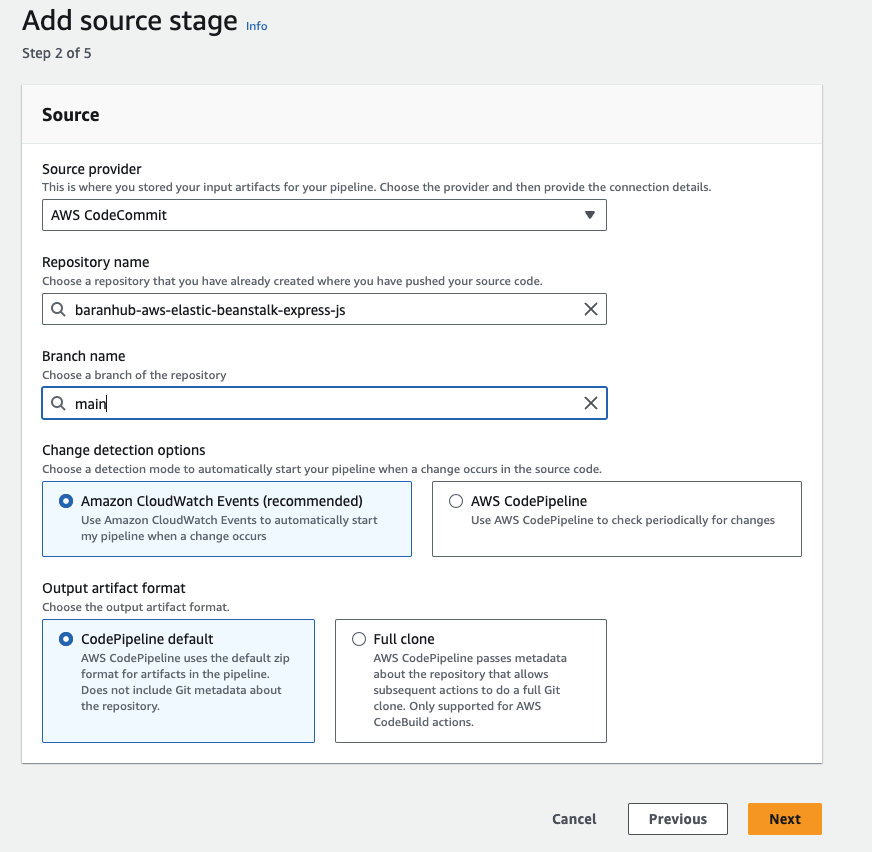
- Under “Source provider”, choose “AWS CodeCommit”.
- Choose “baranhub-aws-elastic-beanstalk-express-js” repository and the main branch.
- Keep “Amazon Cloudwatch Event” as the change detection options. This will allow the pipeline start automatically when a change in Cloudwatch is detected.
- Click “Next” to continue.
Configure the deploy stage
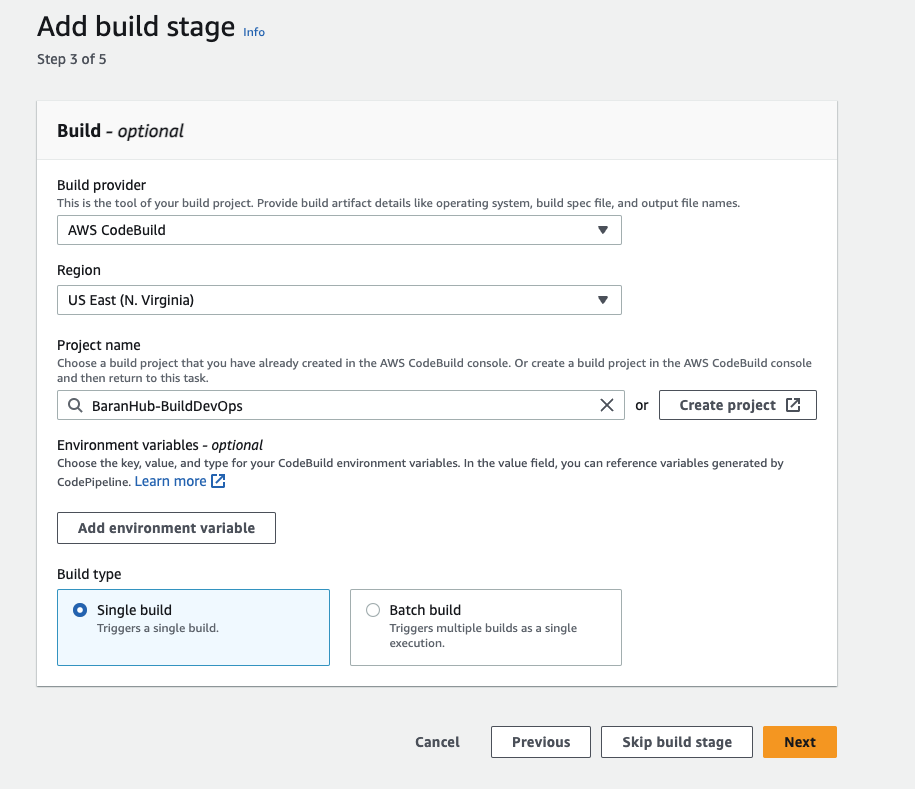
- From the Build provider dropdown menu, select AWS CodeBuild.
- Under Region confirm that the US East (N. Virginia) Region is selected.
- Select BaranHub-BuildDevOps under Project name.
- Choose the orange Next button.
Watch first pipeline execution
- Select AWS Elastic Beanstalk from the Deploy provider dropdown menu.
- Under Region, confirm that the US East (N. Virginia) Region is selected.
- Select the field under Application name and confirm you can see the app BaranHubDevOps.
- Select BaranHubDevOps-env from the Environment name textbox.
- Choose the orange Next button. You will now see a page where you can review the pipeline configuration.
- Choose the Create pipeline button.

Verify the deployment

- Move to the Beanstalk console and click on the domain url to check if the webapp is deployed.

Application architecture
Here’s what our architecture looks like now:
Our continuous delivery pipeline, built on AWS CodePipeline, operates in three stages: source, build, and deploy. It seamlessly retrieves code from the CodeCommit repository (source stage), builds it using AWS CodeBuild (build stage), and finally deploys the built application to our pre-configured AWS Elastic Beanstalk environment.
Step 5 – (Optional) – Configure Pipeline and Test
This section dives into incorporating a manual review stage within your continuous delivery pipeline using AWS CodePipeline.
Here’s the gist:
- Approval Action: We’ll introduce you to approval actions, which act as pause points within your pipeline. This allows someone to manually review changes before deployment, ensuring an extra layer of control.
- Benefits of Review: Adding a manual approval stage empowers you to have someone else assess code modifications before deployment. This can be valuable for catching potential issues or ensuring adherence to coding standards.
- Approval Process: If the reviewer approves the changes, the pipeline continues its execution. However, if the action is rejected, or remains unapproved for seven days, it’s treated as a failure, halting further pipeline progress.
By incorporating a review stage, you can introduce a human element into your automated deployments, promoting code quality and control.
Implementation
Create review stage in pipeline
Here are the steps to create a review stage in your AWS CodePipeline:
- Edit your pipeline: Open the existing “BaranHub-Pipeline-DevOps” pipeline to modify in the AWS CodePipeline console.
- Add a new stage: Click the “+” button to add a new stage after the desired stage where you want the review to occur (e.g., after the build stage). Give the new stage a descriptive name like “Review”.
- Select “Manual approval” action: Within the newly created stage, click the “+” button to add an action group. Choose “Manual approval” as the action provider.

- Configure approval settings: (Optional) Define the people or groups who will be responsible for reviewing the changes. You can specify them by their usernames or IAM roles.
- Optional: Set timeout: (Optional) If desired, establish a time limit for reviewers to act. If no approval or rejection is received within the set timeframe (typically 7 days), the pipeline execution will be treated as a failure.
- Save your changes: Once you’ve configured the review stage, review your selections and save the pipeline changes to activate the new stage.
Additional Notes:
- Manual approvals introduce a human element into your pipeline, allowing for code review and control before deployments.
- Carefully consider who should be authorised for approvals to maintain a smooth workflow.
- Setting a timeout (optional) helps prevent pipelines from stalling indefinitely if approvals are delayed.
Final Test with A Commit
- In your IDE, open the app.js file.
- Replace the file content with the following code:
const express = require('express');
const app = express();
const port = 8080;
const title = 'My Awesome App'; // Added line to define the title

app.get('/', (req, res) => res.send(`<!DOCTYPE html>
<html lang="en">
<head>
<meta charset="UTF-8">
<meta name="viewport" content="width=device-width, initial-scale=1.0">
<title>${title}</title> </head>
<body>
<h1>${title}</h1> <p>Hello World!</p>
</body>
</html>`));

app.listen(port);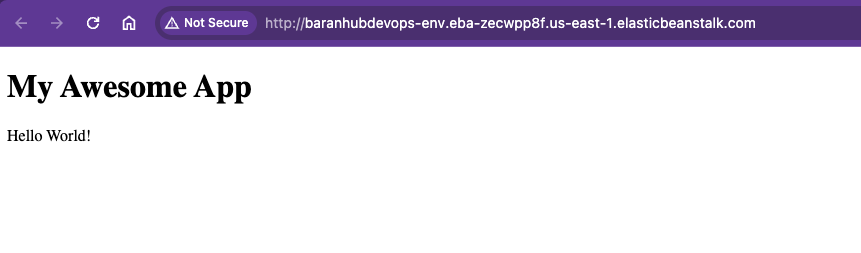
console.log(`App running on http://localhost:${port}`);- Save the file.
- Run the following commands to push the changes to the remote repo.
git add app.js
git commit -m "Full pipeline test"- Push the local changes to the remote repo hosted on CodeCommit with the following command:
git pushMonitor the pipeline and manually approve the change
- Right after you push the changes, it will trigger the pipeline to rerun.
- Choose the pipeline and manually review & approve the changes.
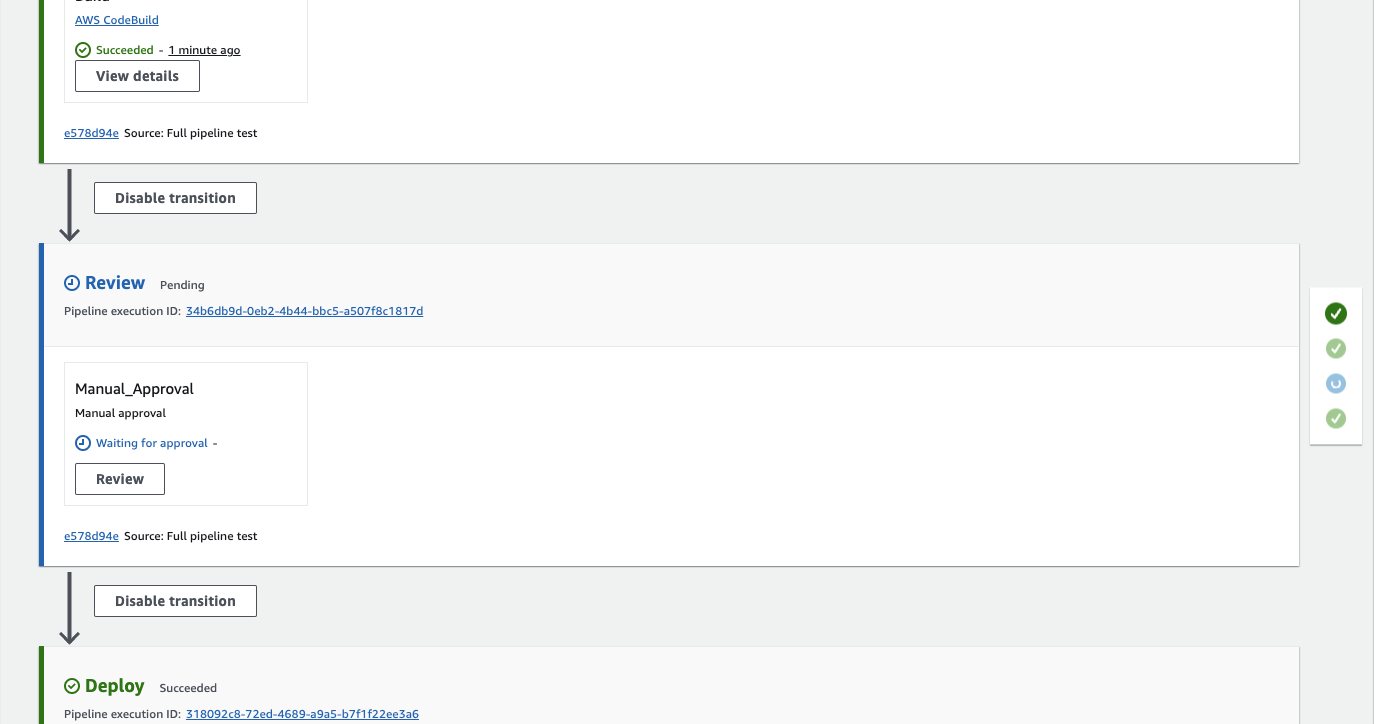
- After the latest execution status moves to “Succeeded”, it is time to check the webapp from the Beanstalk console.
Congratulations! You have a fully functional continuous delivery pipeline hosted on AWS.
Application Architecture Overview
With all modules now completed, here is the architecture of what you built:

We have used AWS CodePipeline to add a review stage with manual approval to our continuous delivery pipeline. Now, our code changes will have to be reviewed and approved before they are deployed to AWS Elastic Beanstalk.
Serdar Baran
As businesses increasingly rely on cloud infrastructure, securing it with best practices becomes crucial to building the future of technology. – that’s where I come in.
With a strong foundation in cloud security best practices, network security and architectural design, I provide cloud infrastructure solutions tailored safeguard your digital assets against evolving cyber threats.
Let’s connect and discuss how we can collaborate to create secure and efficient cloud solutions.